Non-destructive audio editing allows changes to be made to audio clips without permanently altering the original audio files. This gives you the freedom to experiment with edits such as cutting, moving or adjusting your audio, as you can always go back or undo changes if something doesn’t work out.
At first, keeping the original parts of your audio might not seem like a big deal. However, it can definitely save you time and frustration. For example, you might realise you’ve cut out something important, made a mistake, or want to try a different edit. If you’ve preserved the original audio, it’s easy to go back and make those changes without starting over.
This is why learning non-destructive techniques is so helpful – especially when you’re just starting out. The good news is, Audacity offers several tools that help you work this way, so you can edit freely with the knowledge that you can always return to the original audio if needed.
This article is designed to help beginners get started with non-destructive audio editing in Audacity. It introduces some simple and useful techniques that can make your first projects easier to manage and more enjoyable to work on:
Split Function
This function allows you to cut your audio into smaller sections, or "clips," so you can work with each part separately from the rest of the recording. This is especially helpful when you want to move, trim, or apply effects to just one section without affecting the whole track. In addition, as your edits are non-destructive, each clip still gives you access to the original audio underneath. You can go back and adjust things without permanently changing the original recording.
You might wonder, “Why bother splitting a clip when I can just select and delete the parts I don’t want, or apply effects directly?” It’s a good question. Deleting or applying effects without splitting the clip will permanently change the original audio. Once that’s done, you won’t be able to go back and make changes to the original version of that section. Splitting the clip first helps you work more safely and gives you the flexibility to make edits without losing anything important.
How to use it
To make splits in an audio clip, select the Selection Tool from the Audacity Edit Toolbar (Shortcut: F1) and click on the timeline to set a timestamp for your split.

Alternatively, click and drag to highlight a fragment of audio you want to separate. If you need to make a selection across multiple tracks, drag across those tracks as well.
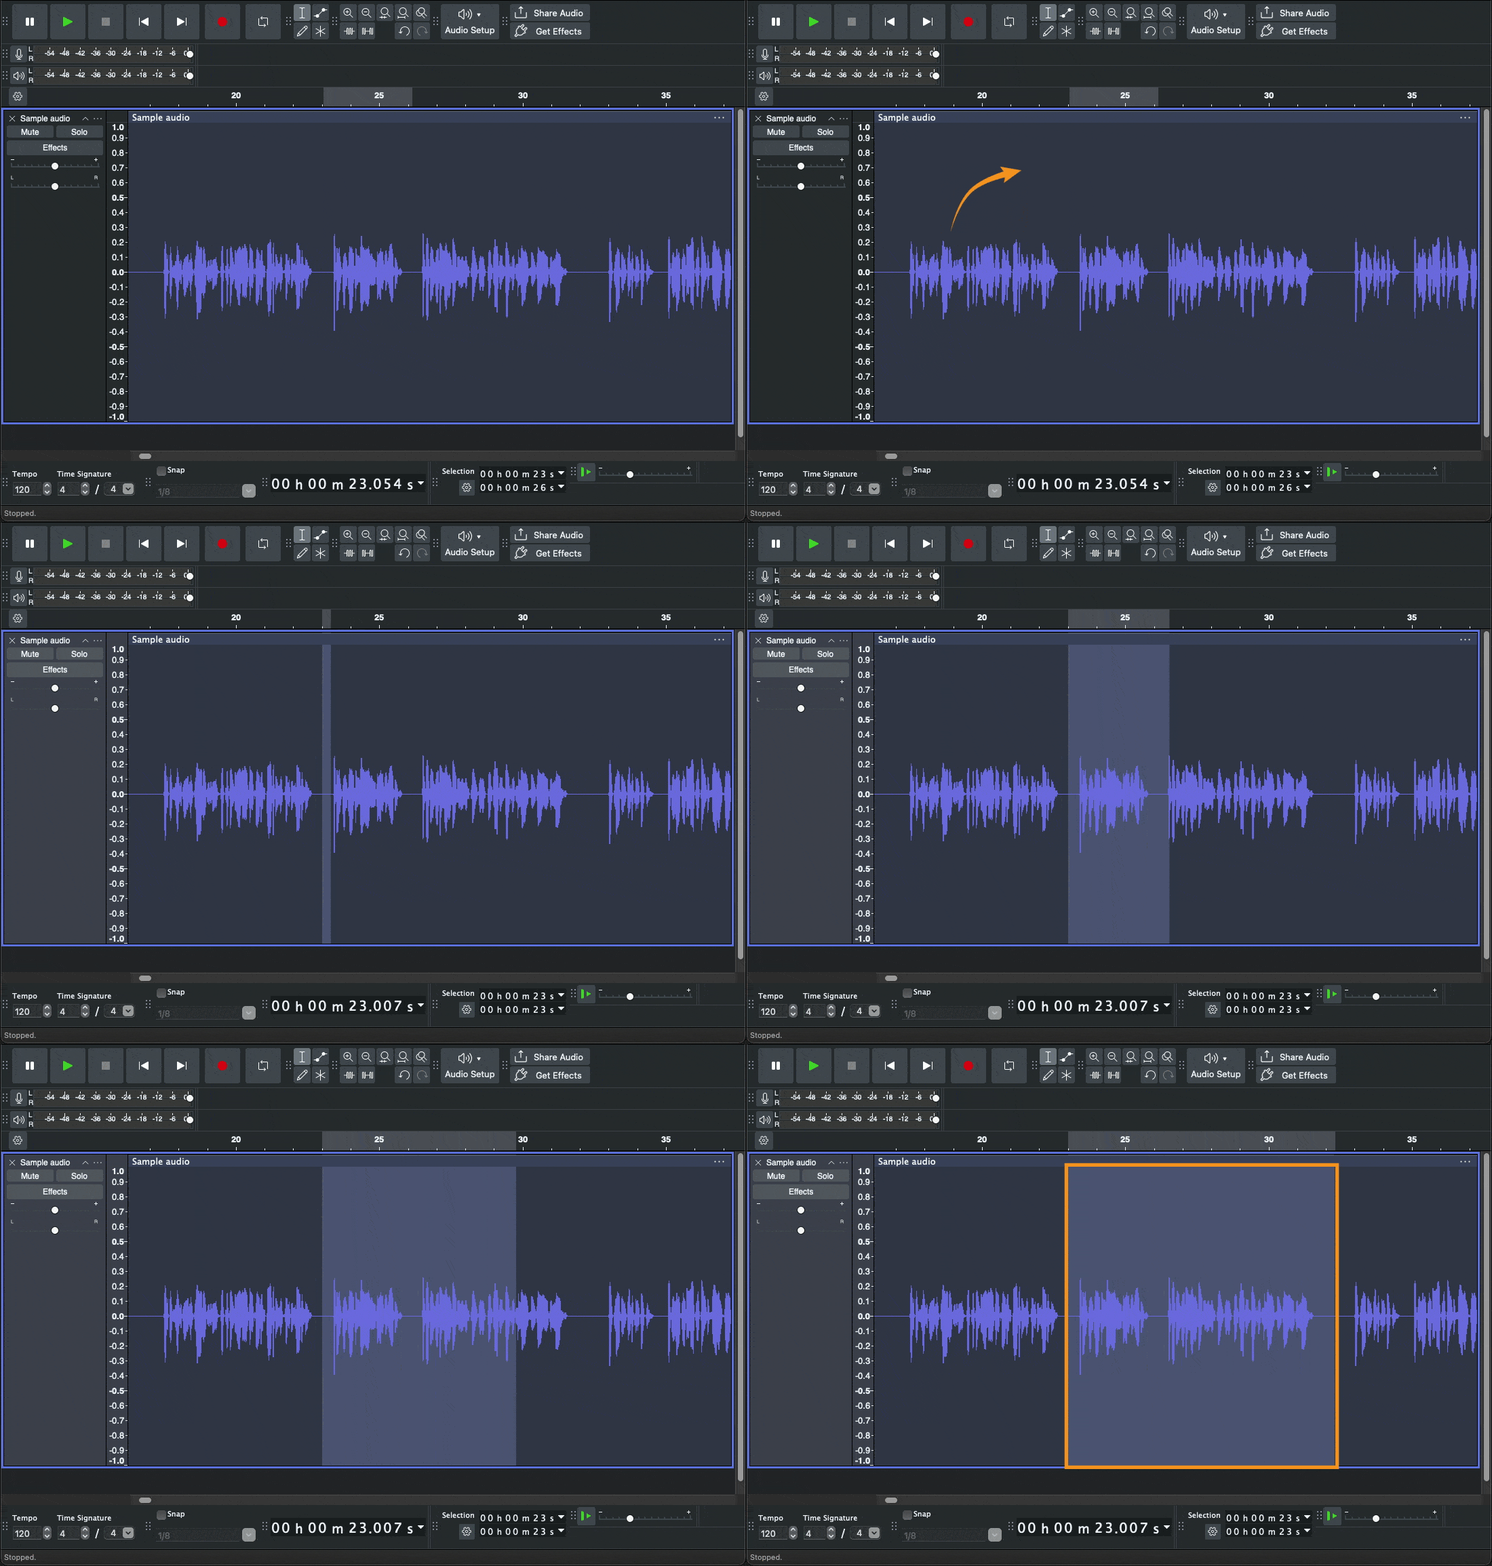
Then go to Edit > Audio Clips > Split, or use the keyboard shortcut Ctrl + I (or Command + I on a Mac). This will divide the audio clip at the selected point or region. You can then move, delete, or edit the split sections independently.
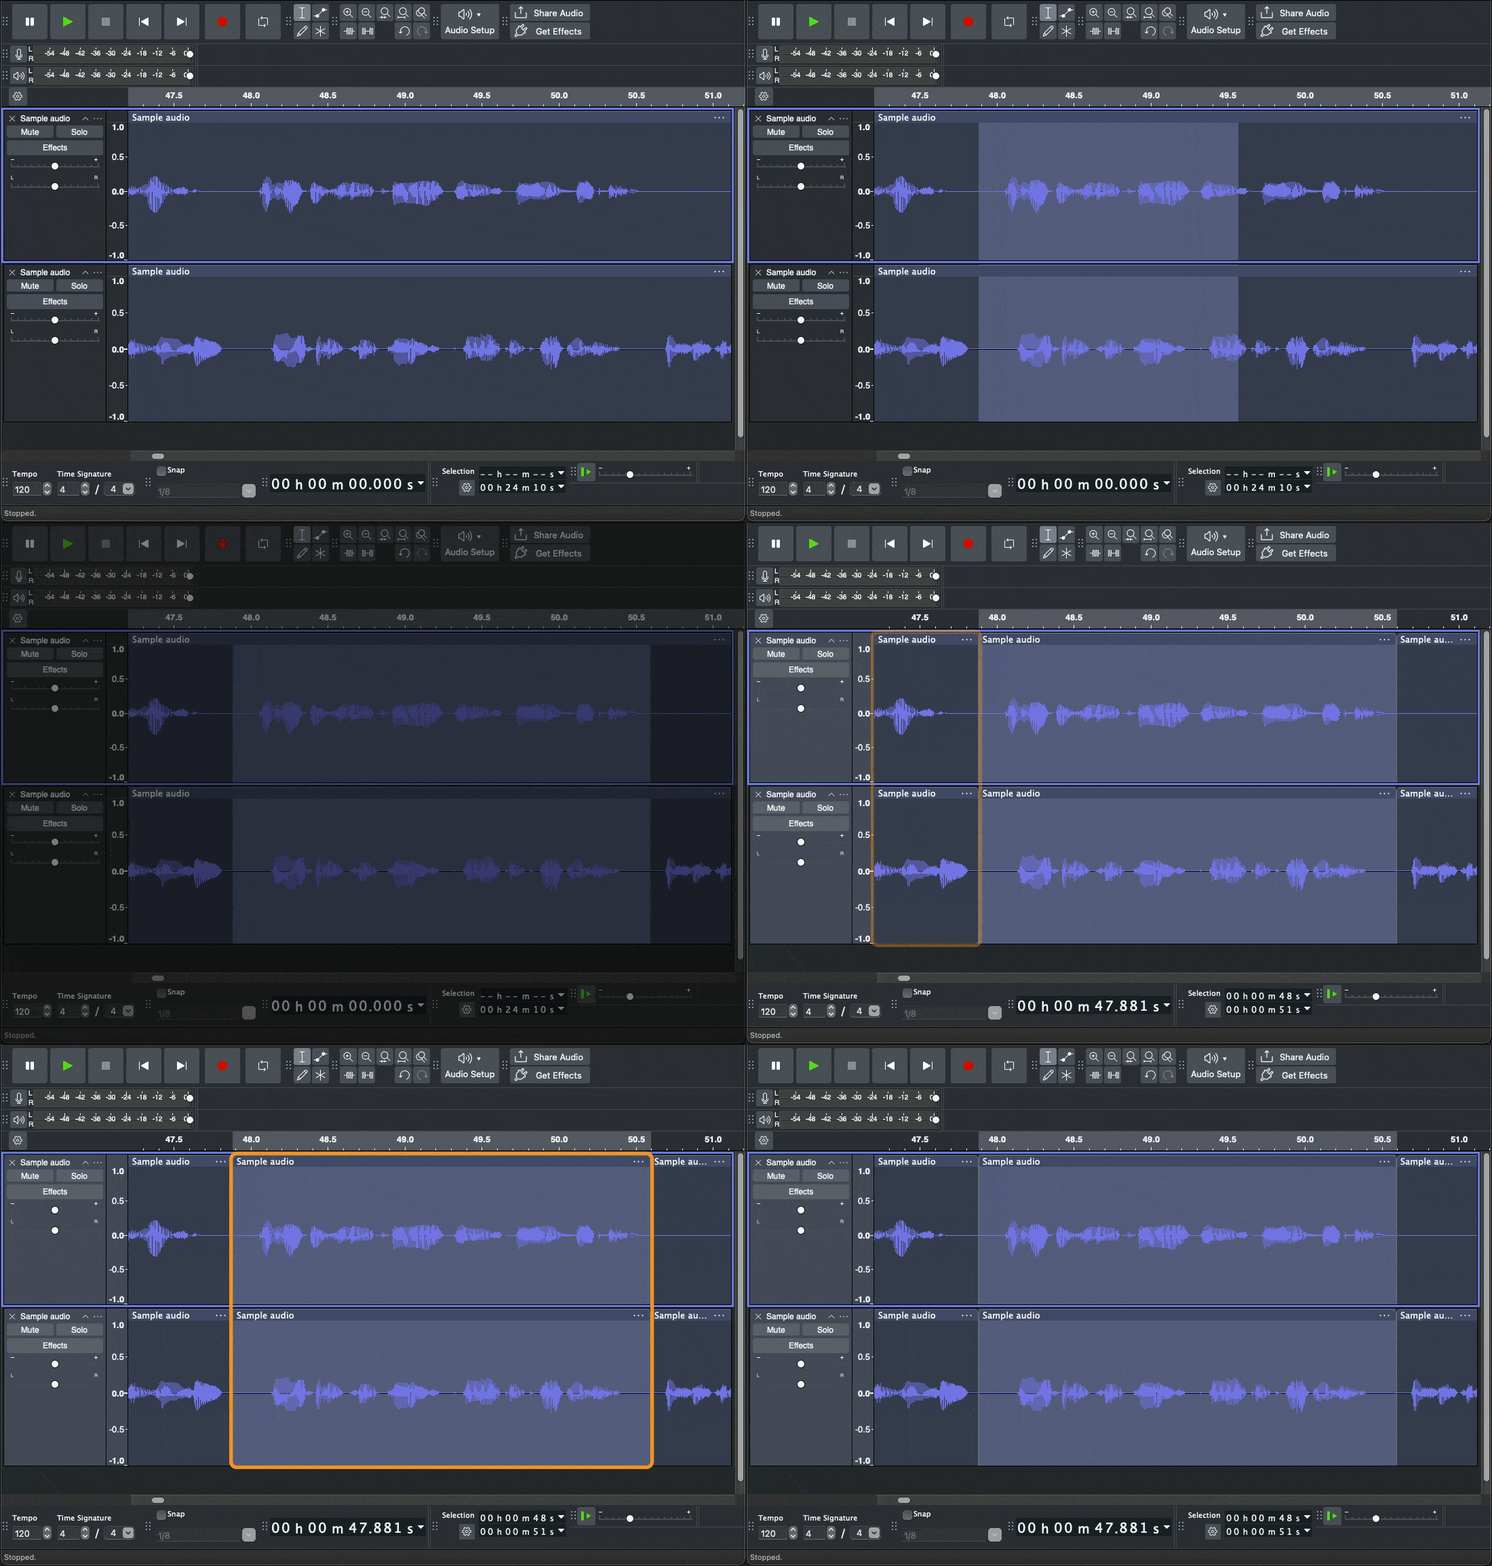
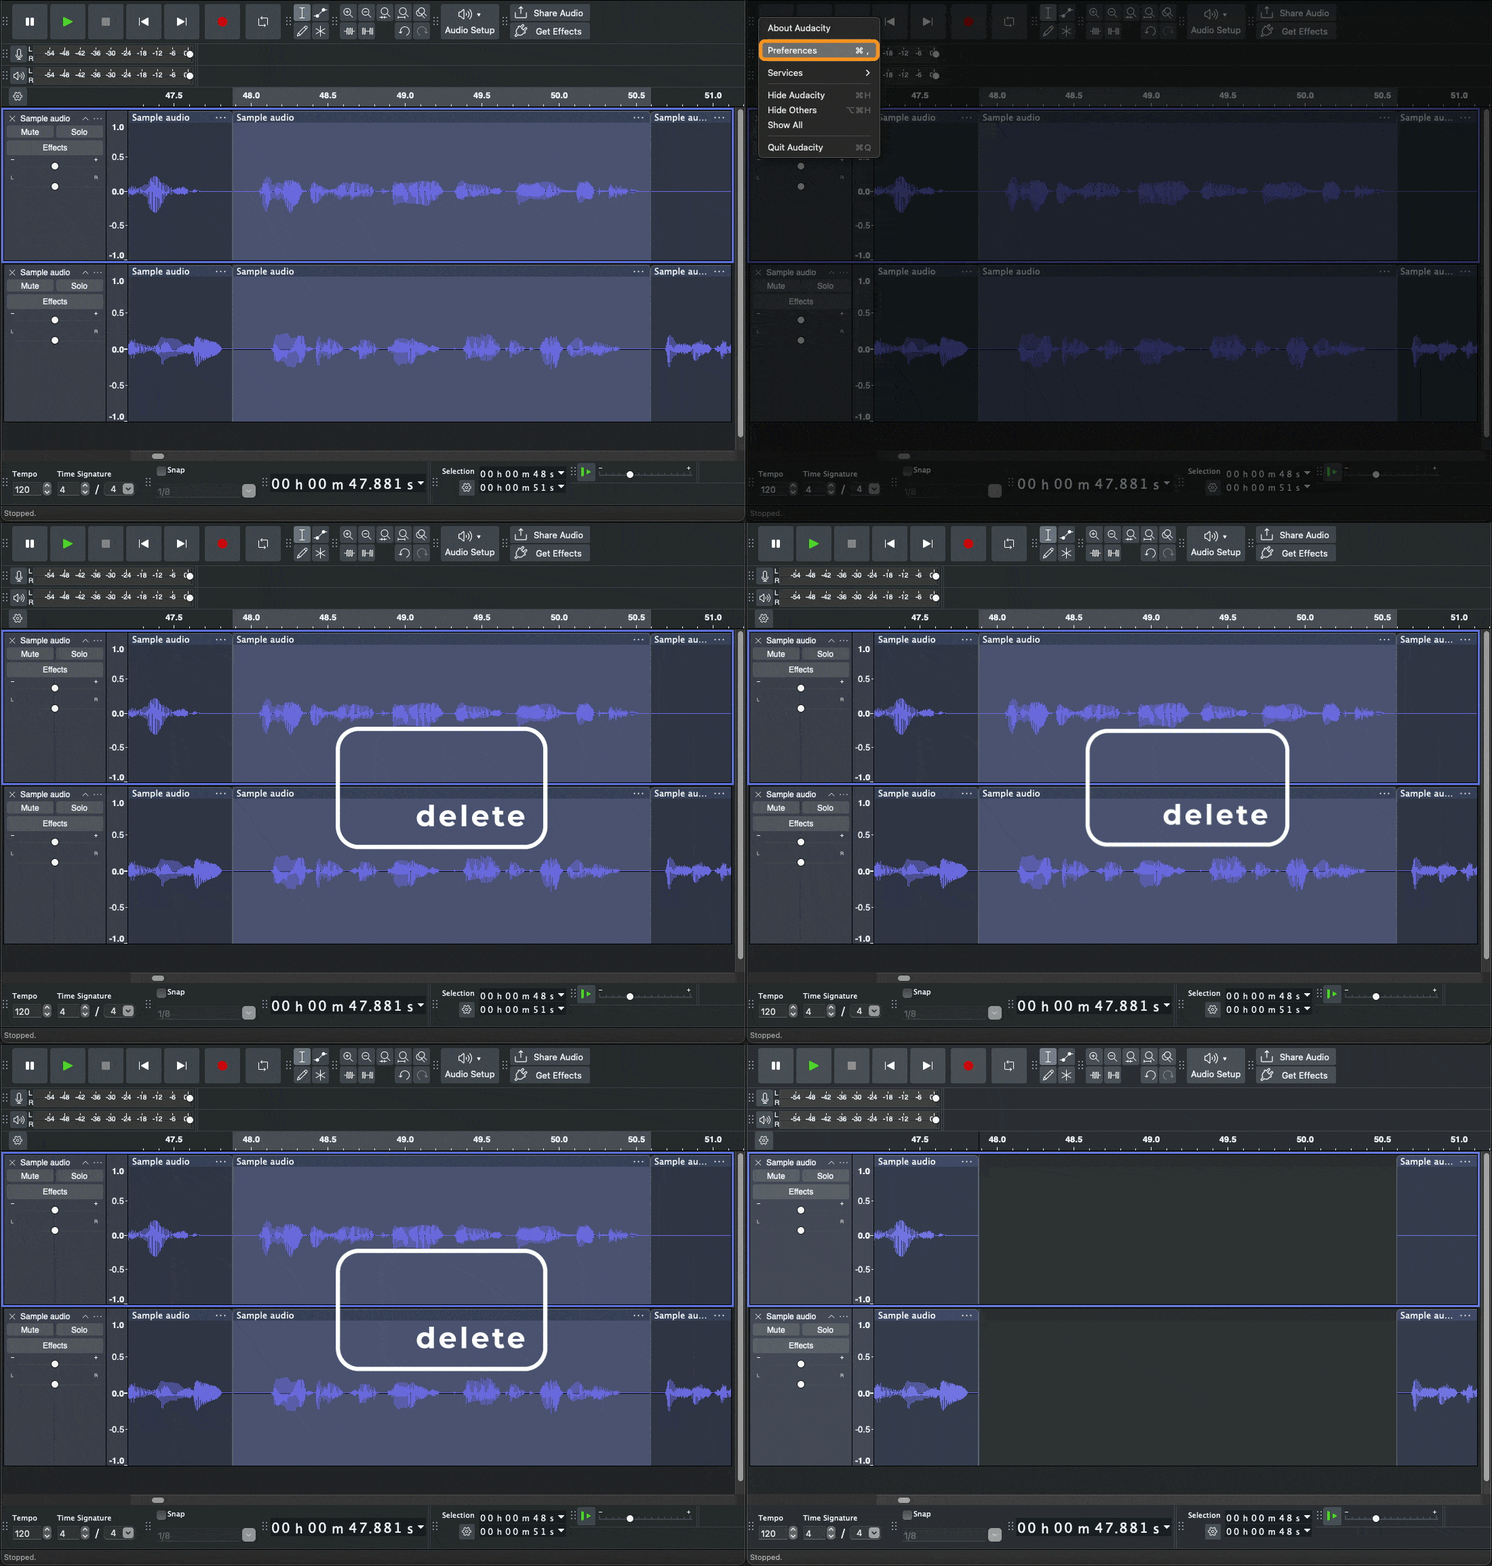
If you want clips on the same track to shift automatically to close any gaps created by deletions, go to Edit > Preferences > Tracks Behaviours, and enable the option "Editing a clip can move other clips".
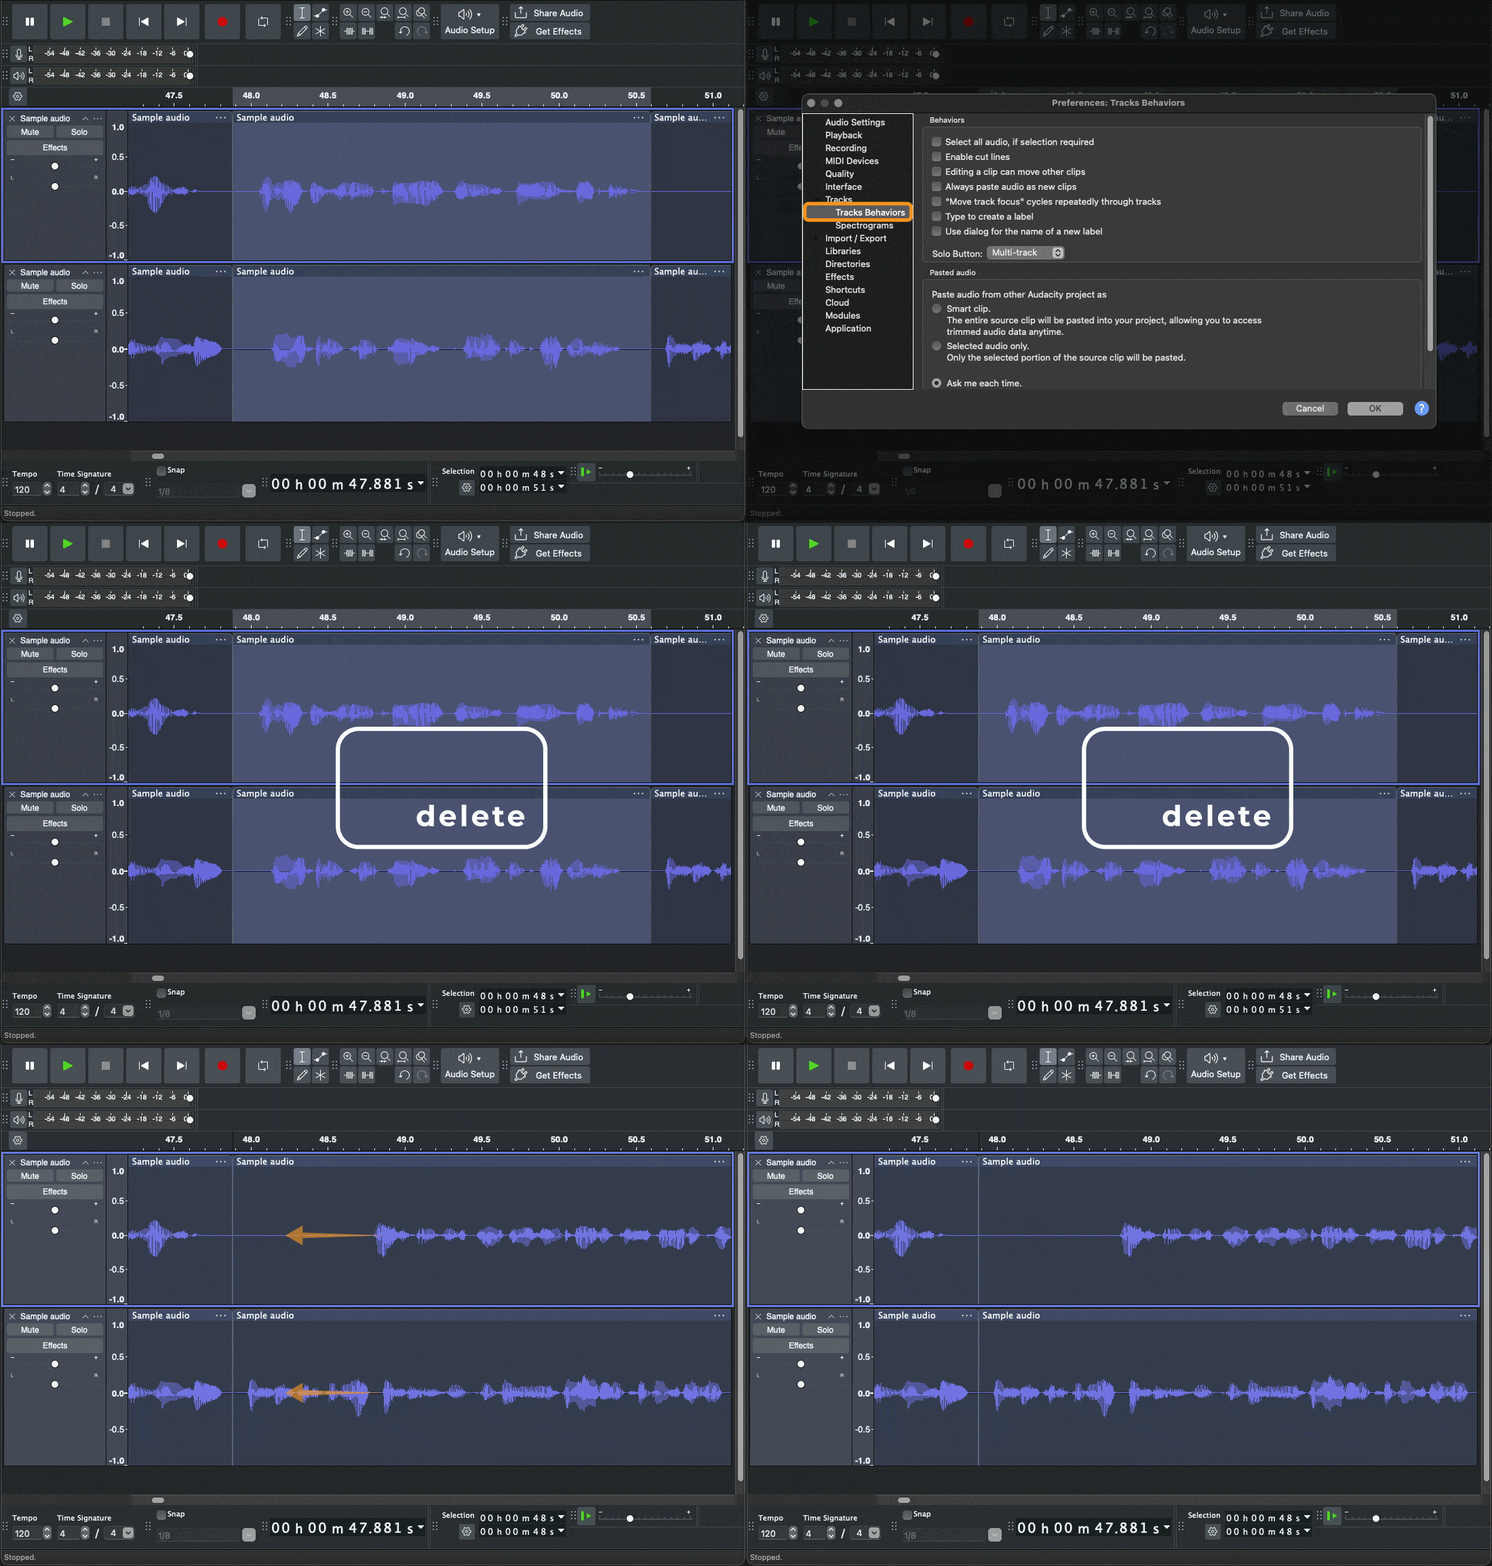
Note that by default, this setting is off and as a result, clips will remain stationary unless this preference is changed.
Envelope Tool
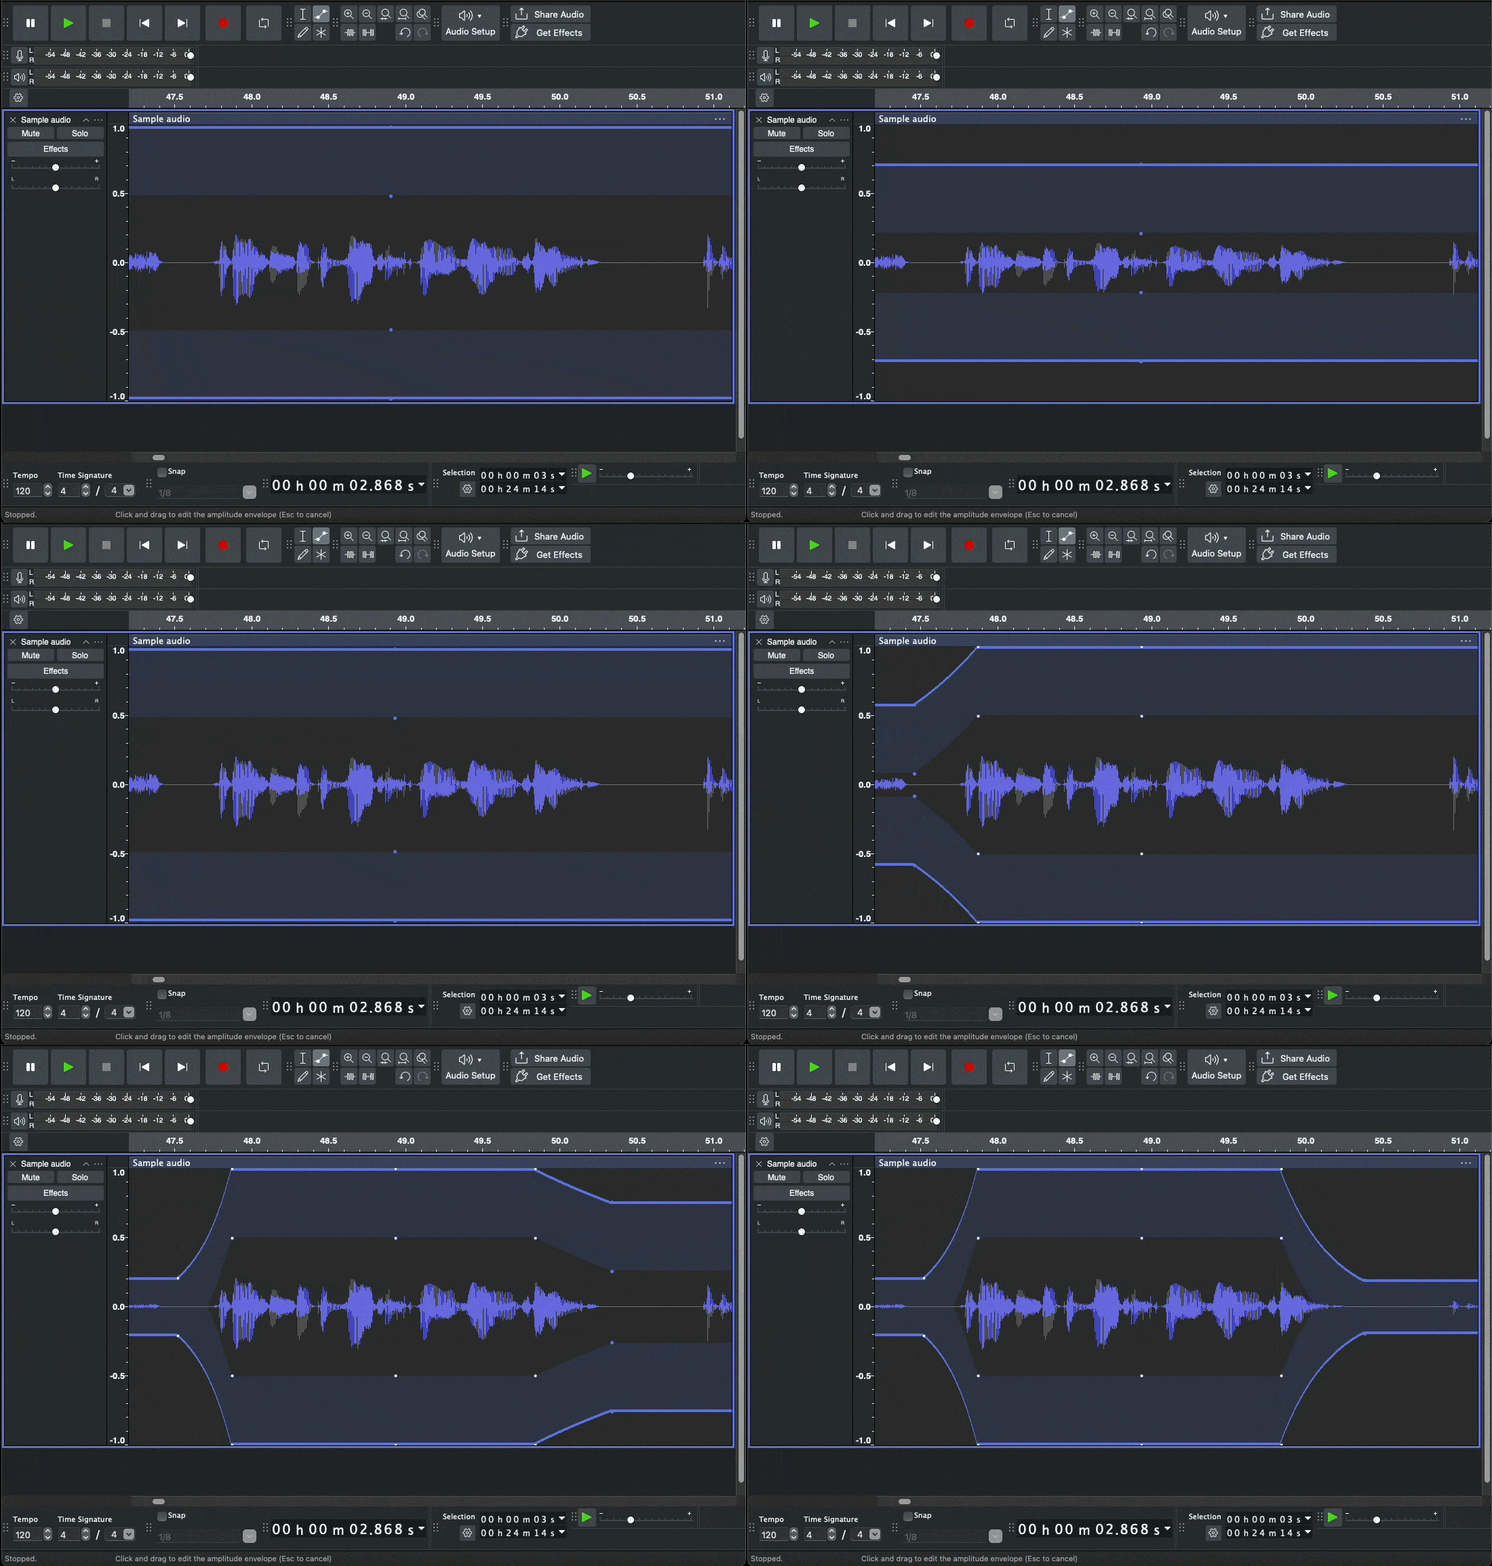
This tool is a simple and powerful way to control the volume of your audio over time. It lets you make certain parts quieter or louder and helps create smooth fade-ins, fade-outs, or gradual volume changes. This is done by setting "control points" on your audio track that control the volume between them - similar to using "keyframes" in other editing programs.
The non-destructive nature of the Envelope tool means your original audio stays untouched, and you can go back and change your volume adjustments at any time. You won’t lose any part of your recording, no matter how many times you tweak it.
How to use it
To use the Envelope Tool, click on the Envelope icon in the Edit Toolbar (or press F2).

Then, click on the waveform to add control points. You can drag these points up to increase the volume or down to lower it. By placing multiple control points, you create a volume “envelope” that smoothly adjusts the sound throughout your track. And if you want to make changes later, just move or delete the points – it’s that easy.
Bonus Tip
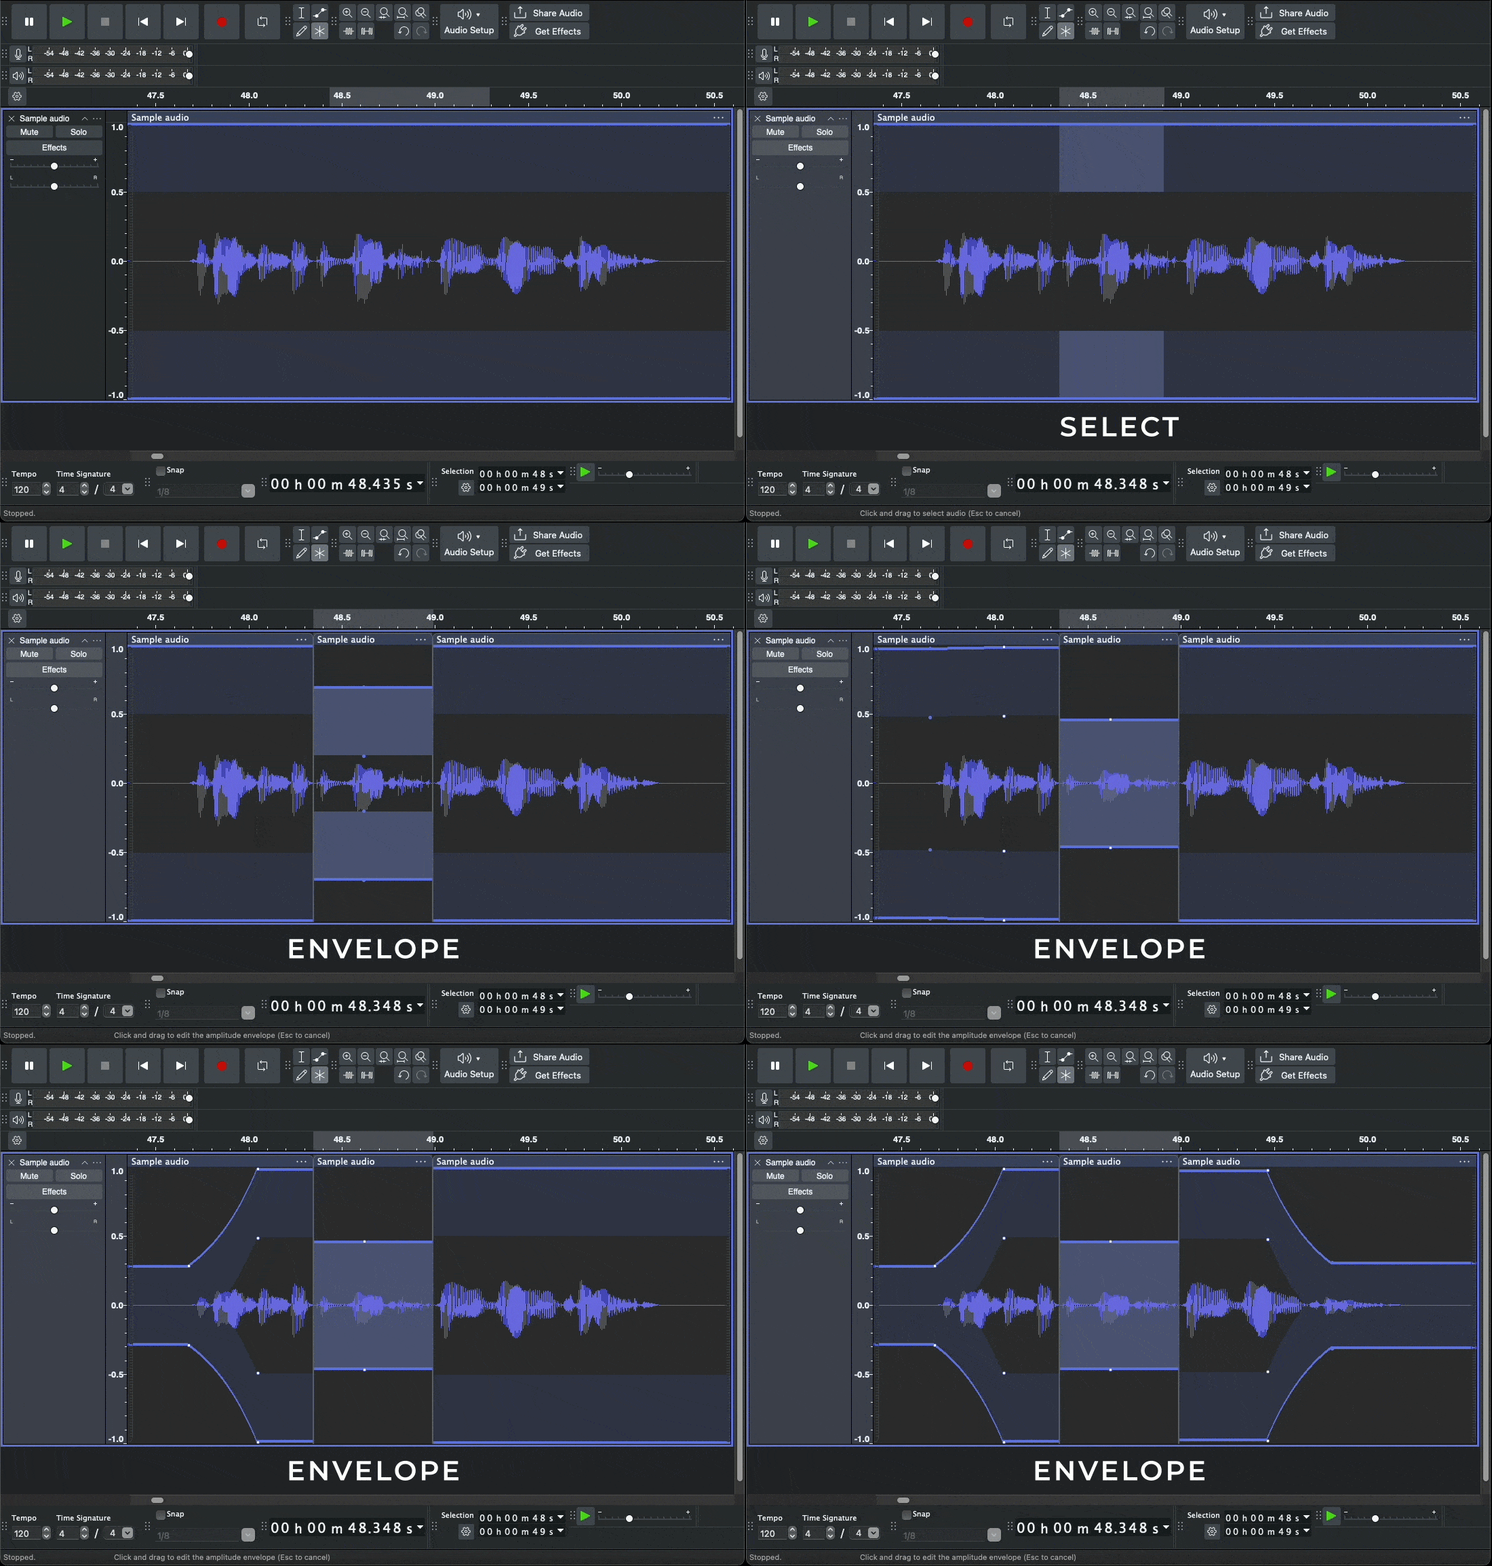
If you want to save time and work more efficiently, try using the Multi-Tool (shortcut: F6).

This handy tool combines the features of several other tools in Audacity so you can perform multiple editing actions without constantly switching tools. For example, you can use this tool to Select, Press the Ctrl + I shortcut to Split and then automatically use the Envelope function without having to click on each icon separately. It’s perfect for when you’re getting more comfortable with editing and want to speed up your workflow.
Labels
Wanting to add markers or notes to your timeline? The Labels tool is exactly what you need. This tool allows you to mark important points in your project for easy navigation, future edits, or even to jot down quick notes – all without affecting your audio. Labels are stored in a separate "Labels Track", so your original audio remains untouched.
How to use it
To add a label, simply select a point or a section of audio, then go to Edit > Labels > Add Label at Selection. You can also use the shortcut Ctrl + B (or Command + B on Mac). A label will appear in the Labels Track, where you can type your note.
From there, using the label is quite straightforward. Need to move a label? Just drag it along the timeline. Want to change the text? Click on it and start typing. To remove a label, select it and press Delete.
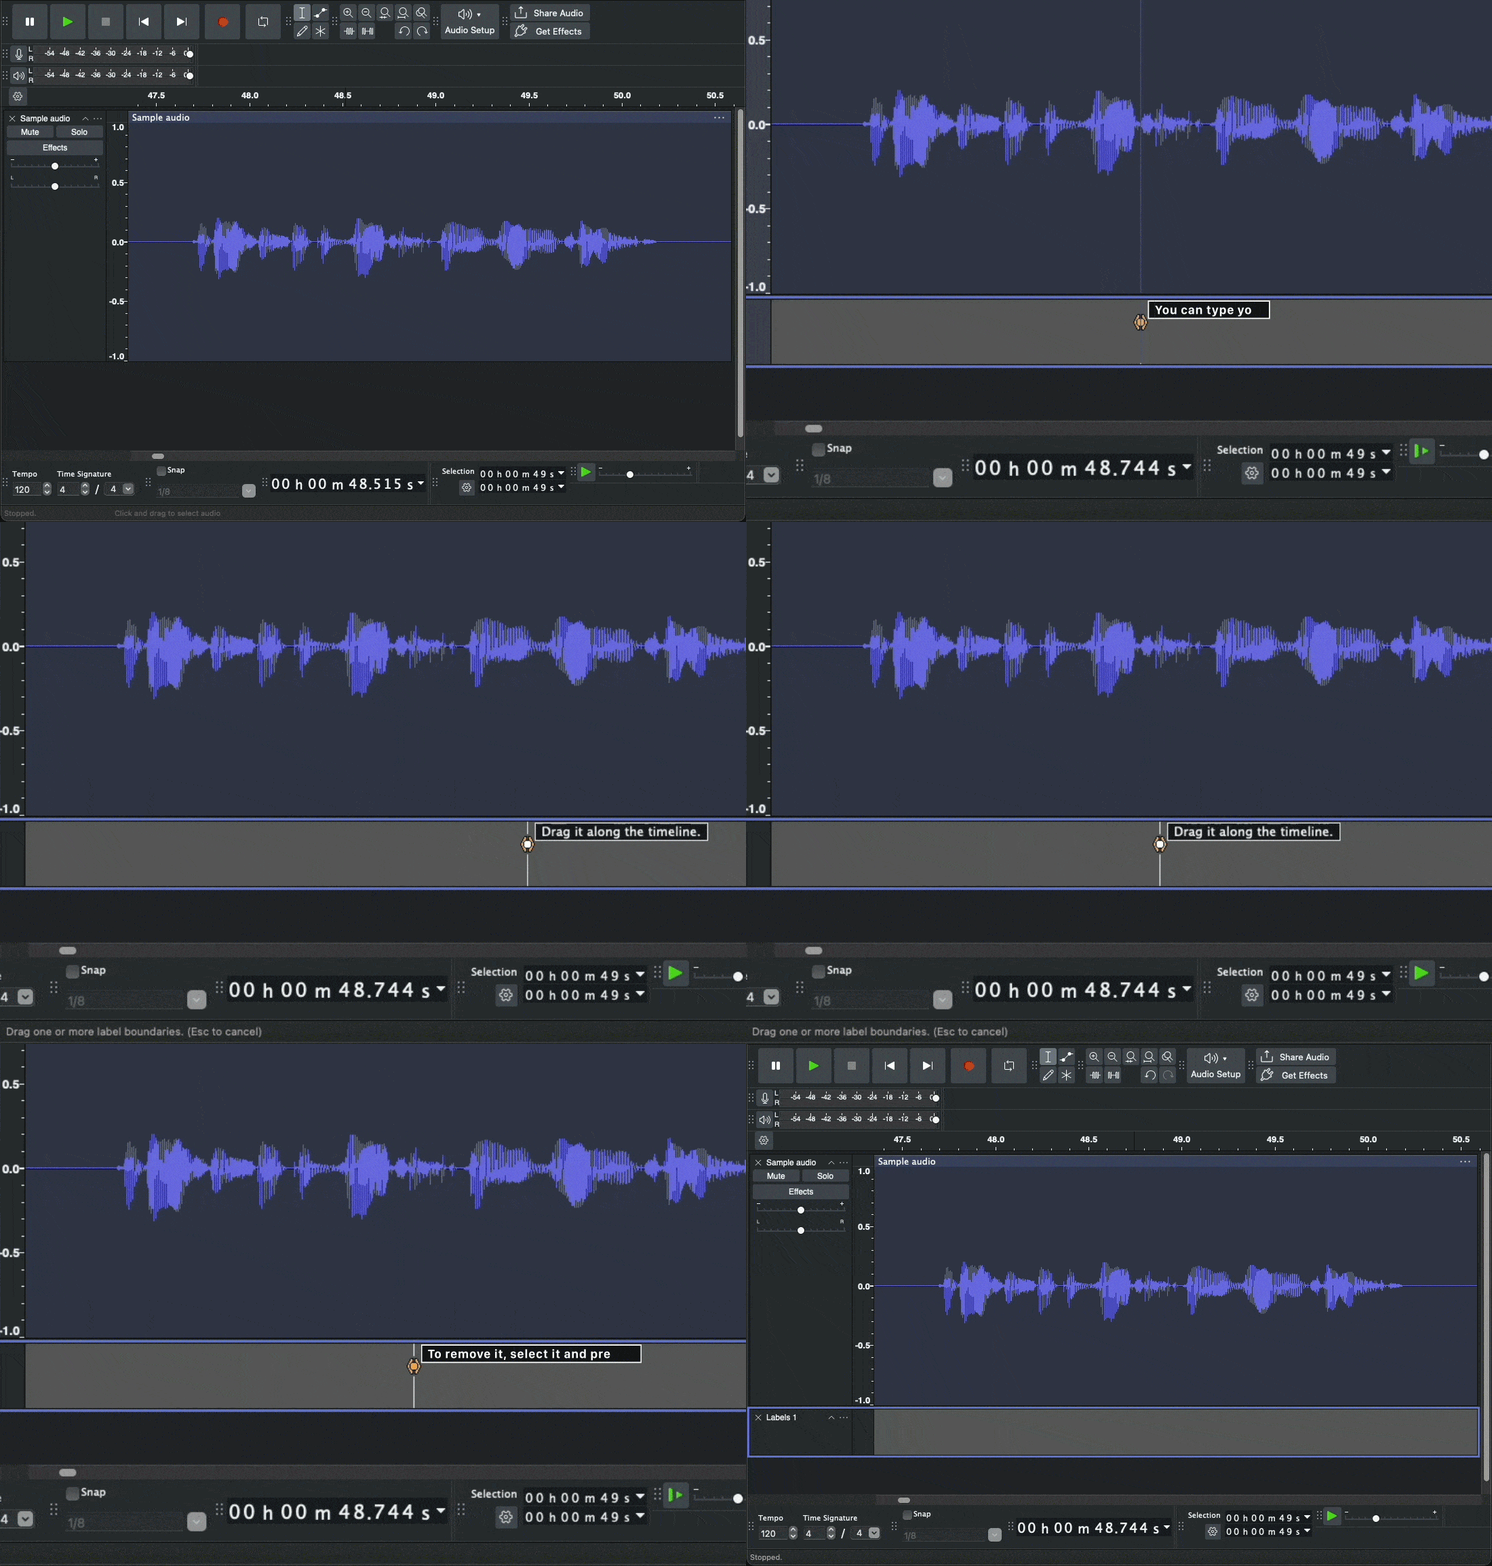
Labels are especially helpful when you're working on longer projects, collaborating with others, or editing in stages. They make it easy to jump back to key moments, keep track of changes, or highlight parts that need review. Once you get used to them, you’ll wonder how you ever edited without them!
Saving a Copy
Have you ever wished you had a clean copy of your project after accidentally saving over it with unwanted edits? You’re not alone as it happens to all of us at some point. That’s why it’s always a good idea to keep a backup.
As raised earlier, some editing actions – especially when applying effects – can permanently change your audio. If you save the project after making those changes, it can be difficult (or even impossible) to go back to the earlier version. To avoid losing your work, it’s best to save a backup copy before making any major or irreversible edits. This simple step helps keep your workflow as non-destructive as possible.
How to use it
To create a backup copy in Audacity:
- Go to File > Save Project > Save Project As
- Choose where you’d like to save the backup
- Give the project a new name (for example, add “_backup” or the date)
- Click Save
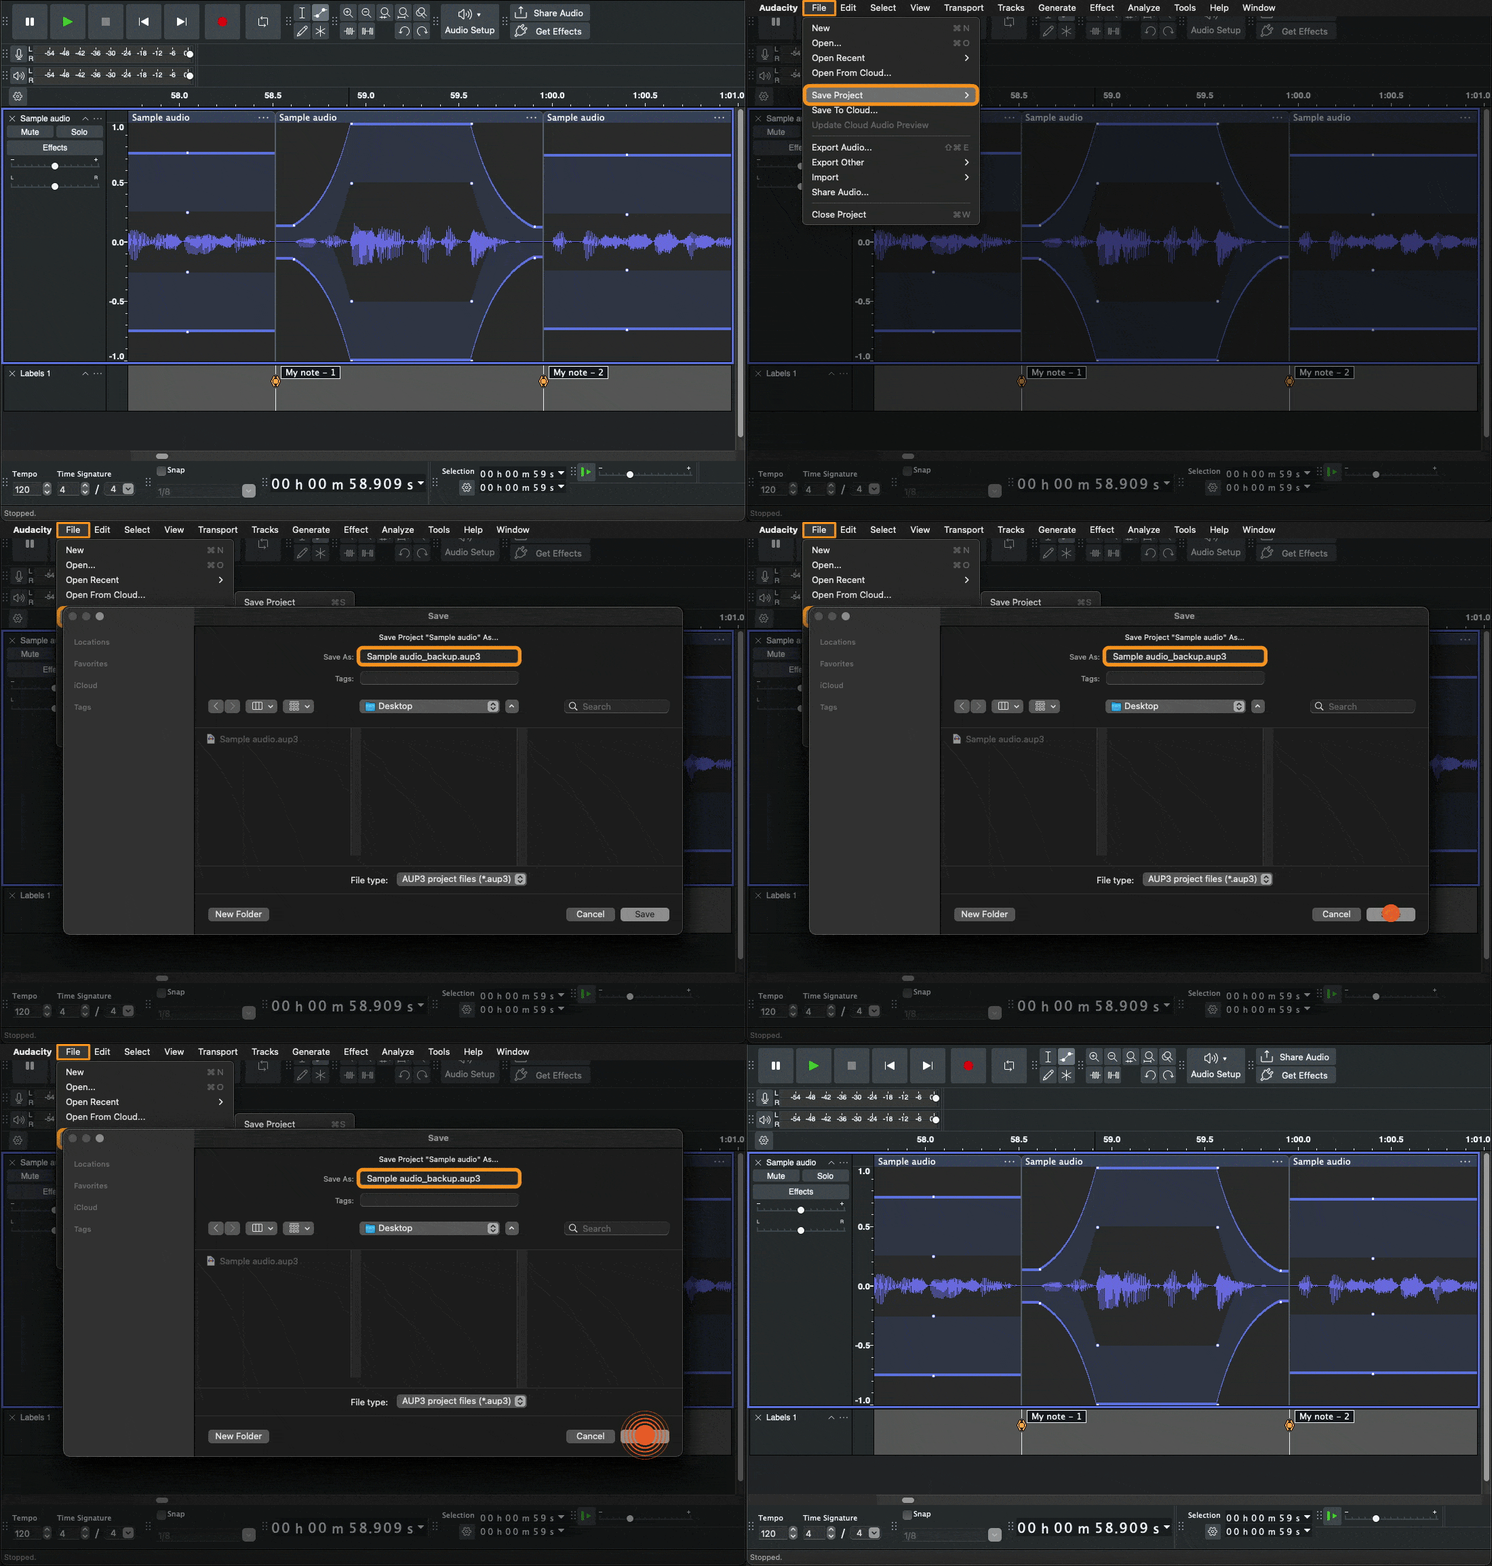
Now, you can edit freely, knowing that your original version is safe and sound. It’s a small habit that can save you a lot of time and frustration later.
Non-destructive editing is essential for maintaining flexibility, minimising risk, and ensuring a smooth workflow in audio production. By using tools like Split Clip, the Envelope Tool, and Labels, and by saving copies of your project at key stages, you can work efficiently without compromising your original audio. Audacity offers all the essential features needed to support this approach, making it a powerful tool for beginners and seasoned editors alike.


